现代设备加密实践 [2/3]
使用 BitLocker / LUKS 闷声发大财
本页大概是 cheatsheet 一类的东西,留个简单记录备查不算坏。
LUKS setup (with systemd) #
以 Arch Linux 为例,其它发行版思路基本一致:使用 systemd-ukify 生成并签名 UKI
Partitioning #
fdisk
 1> fdisk /dev/nvme0n1
 2m
 3g
 4n
 5
 6
 7
 8+700M
 9n
10
11
12
13
14t
151
16L
171
18p
19w
20> mkfs.fat -F32 /dev/nvme0n1p11cryptsetup luksFormat /dev/nvme0n1p2
2cryptsetup open /dev/nvme0n1p2 arch_root
3cryptsetup --perf-no_read_workqueue --perf-no_write_workqueue --allow-discards --persistent refresh arch_root
4mkfs.ext4 /dev/mapper/arch_root
5mount /dev/mapper/arch_root /mnt
6mkdir -p /mnt/boot
7mount /dev/nvme0n1p1 /mnt/bootarchinstall #
Note: 完整安装需要做更多事情,比如 改密码、加用户、启用 NetworkManager 等
1pacstrap -K /mnt base linux linux-firmware efibootmgr systemd-ukify vim intel-ucode #amd-ucode
2genfstab -U /mnt >> /mnt/etc/fstab
3arch-chroot /mnt
4ln -sf /usr/share/zoneinfo/Asia/Shanghai /etc/localtime && hwclock --systohc
5sed -i 's/#en_US.UTF-8/en-US.UTF-8/' /etc/locale.gen && locale-gen
6echo "LANG=en_US.UTF-8" > /etc/locale.conf
7echo "localhost" > /etc/hostname
8touch /etc/vconsole.conf
9bootctl installpostinstall #
查看 blkid 得到:
/dev/nvme0n1p2: UUID="f6aa37ef-1537-4610-ae99-95262aed4a36" TYPE="crypto_LUKS" ...
/dev/mapper/arch_root: UUID="8ac7c8ed-31ec-48ce-8b58-cd61d9b0260a" BLOCK_SIZE="4096" TYPE="ext4"相应地,写入 /etc/crypttab.initramfs 并 chmod 为 0600
# Configuration for encrypted block devices.
# See crypttab(5) for details.

# <name>       <device>                                     <password>              <options>
arch_root UUID=f6aa37ef-1537-4610-ae99-95262aed4a36 - luks,discard#,tpm2-device=auto,tpm2-measure-pcr=yes,fido2-device=auto写入 /etc/kernel/cmdline
root=UUID=8ac7c8ed-31ec-48ce-8b58-cd61d9b0260a rw修改 /etc/mkinitcpio.d/linux.preset
11,12c11,12
< default_image="/boot/initramfs-linux.img"
< #default_uki="/efi/EFI/Linux/arch-linux.efi"
---
> #default_image="/boot/initramfs-linux.img"
> default_uki="/boot/EFI/Linux/arch-linux.efi"
修改 /etc/mkinitcpio.conf,增加 sd-encrypt hook 并关闭 initramfs 压缩。
--- a/mkinitcpio.conf
+++ b/mkinitcpio.conf
@@ -52,7 +52,7 @@
 #
 ##   NOTE: If you have /usr on a separate partition, you MUST include the
 #    usr and fsck hooks.
-HOOKS=(base systemd autodetect microcode modconf kms keyboard keymap sd-vconsole block filesystems fsck)
+HOOKS=(base systemd autodetect microcode modconf kms keyboard sd-vconsole sd-encrypt block filesystems fsck)

 # COMPRESSION
 # Use this to compress the initramfs image. By default, zstd compression
@@ -65,6 +65,7 @@
 #COMPRESSION="xz"
 #COMPRESSION="lzop"
 #COMPRESSION="lz4"
+COMPRESSION="cat"

 # COMPRESSION_OPTIONS
 # Additional options for the compressor
执行 mkinitcpio -P,重启进入系统
Secure Boot #
TPM2 enrollment #
生成用于 PCR 签名的公私钥
ukify genkey \
    --pcr-private-key=/etc/systemd/tpm2-pcr-private-key.pem \
--pcr-public-key=/etc/systemd/tpm2-pcr-public-key.pem写入 /etc/kernel/uki.conf
 1[UKI]
 2PCRBanks=sha256
 3PCRPKey=/etc/systemd/tpm2-pcr-public-key.pem
 4
 5[PCRSignature:initrd]
 6Phases=enter-initrd
 7PCRPrivateKey=/etc/systemd/tpm2-pcr-private-key.pem
 8PCRPublicKey=/etc/systemd/tpm2-pcr-public-key.pem
 9
10[PCRSignature:system]
11Phases=enter-initrd:leave-initrd enter-initrd:leave-initrd:sysinit
12       enter-initrd:leave-initrd:sysinit:ready
13PCRPrivateKey=/etc/systemd/tpm2-pcr-private-key.pem
14PCRPublicKey=/etc/systemd/tpm2-pcr-public-key.pem增加 tpm2 slot
systemd-cryptenroll \
  --wipe-slot=tpm2 \
  --tpm2-device=auto \
  --tpm2-pcrs=7+15:sha256=0000000000000000000000000000000000000000000000000000000000000000 \
# --tpm2-public-key=/etc/systemd/tpm2-pcr-public-key.pem \
# --tpm2-public-key-pcrs=11:sha256 \
  --tpm2-with-pin=yes \
/dev/nvme0n1p2修改 /etc/crypttab.initramfs 取消 discard 标志后的注释,执行 mkinitcpio -P
FIDO2 enrollment #
> sudo systemd-cryptenroll --fido2-device=list
PATH         MANUFACTURER PRODUCT        COMPATIBLE RK CLIENTPIN UP UV ALWAYSUV
/dev/hidraw8 canokeys.org CanoKey Pigeon ✓          ✓  ✓         ✓  ✗  ✗

Legend: RK        → Resident key
        CLIENTPIN → PIN request
        UP        → User presence
        UV        → User verification
        AlwaysUV  → User verification Required

> systemd-cryptenroll /dev/nvme0n1p2 --fido2-device=auto --fido2-credential-algorithm=eddsa更换 passphrase #
cryptsetup luksChangeKey /dev/nvme0n1p2Note: 由于启用了 PCR 15,--unlock-tpm2-device 不会工作,因此绝对不可以直接使用 systemd-cryptenroll --wipe-slot=password
Special: LUKS + Opal #
需要 sedutil
首先使用 sedutil-cli --PSIDrevert 指令 take ownership
并在设置 LUKS 分区时,cryptsetup luksFormat 指令携带 --hw-opal-only 参数
Special: 设置 TPM lockout #
需要 tpm2-tools,见 man page [1] [2]
Measured Boot 是如何工作的 #
观察以下指令输出:
mkinitcpio
> mkinitcpio -p linux
==> Building image from preset: /etc/mkinitcpio.d/linux.preset: 'default'
==> Using default configuration file: '/etc/mkinitcpio.conf'
  -> -k /boot/vmlinuz-linux -U /boot/EFI/Linux/arch-linux.efi
// ..snip..
==> Initcpio image generation successful
==> Creating unified kernel image: '/boot/EFI/Linux/arch-linux.efi'
  -> Using ukify to build UKI
Using config file: /etc/kernel/uki.conf
+ /usr/lib/systemd/systemd-measure sign --osrel= --cmdline= --uname= --pcrpkey=/etc/systemd/tpm2-pcr-public-key.pem --linux=/boot/vmlinuz-linux --initrd= --sbat= --bank=sha256 --private-key=/etc/systemd/tpm2-pcr-private-key.pem --public-key=/etc/systemd/tpm2-pcr-public-key.pem --phase=enter-initrd
+ /usr/lib/systemd/systemd-measure sign --osrel= --cmdline= --uname= --pcrpkey=/etc/systemd/tpm2-pcr-public-key.pem --linux=/boot/vmlinuz-linux --initrd= --sbat= --bank=sha256 --private-key=/etc/systemd/tpm2-pcr-private-key.pem --public-key=/etc/systemd/tpm2-pcr-public-key.pem --phase=enter-initrd:leave-initrd --phase=enter-initrd:leave-initrd:sysinit --phase=enter-initrd:leave-initrd:sysinit:ready
Wrote unsigned /boot/EFI/Linux/arch-linux.efi
==> Unified kernel image generation successful
==> Running post hooks
  -> Running post hook: [sbctl]
Signing /boot/EFI/Linux/arch-linux.efi
✓ Signed /boot/EFI/Linux/arch-linux.efi
==> Post processing doneukify inspect
> ukify inspect /boot/EFI/Linux/arch-linux.efi
.sbat:
  size: 323 bytes
  sha256:
  text:
    sbat,1,SBAT Version,sbat,1,https://github.com/rhboot/shim/blob/main/SBAT.md
    systemd-stub,1,The systemd Developers,systemd,260,https://systemd.io/
    systemd-stub.arch,1,Arch Linux,systemd,260,https://archlinux.org/packages/core/x86_64/systemd/
    uki,1,UKI,uki,1,https://uapi-group.org/specifications/specs/unified_kernel_image/
.osrel:
  size: 408 bytes
  sha256: 1c6bb63999d11ef6714d9f182b3b008315677df4d0386928fb5a00918a055890
  text:
    VERSION_ID=6.19.9-arch1-1
    NAME="Arch Linux"
    PRETTY_NAME="Arch Linux"
    ID=arch
    BUILD_ID=rolling
    ANSI_COLOR="38;2;23;147;209"
    HOME_URL="https://archlinux.org/"
    DOCUMENTATION_URL="https://wiki.archlinux.org/"
    SUPPORT_URL="https://bbs.archlinux.org/"
    BUG_REPORT_URL="https://gitlab.archlinux.org/groups/archlinux/-/issues"
    PRIVACY_POLICY_URL="https://terms.archlinux.org/docs/privacy-policy/"
    LOGO=archlinux-logo
.cmdline:
  size: 202 bytes
  sha256: 4975e8e961a40b6ea2db275e364ce49363fd24e471db3d8c37f6383b3552ac25
  text:
.uname:
  size: 14 bytes
  sha256: 8a46ec6bd08e4a101ab8e7928c033f38b2c55789fbd9237b4ba474795ffc7e44
  text:
    6.19.9-arch1-1
.pcrpkey:
  size: 451 bytes
  sha256:
  text:
.linux:
  size: 16468624 bytes
  sha256:
.initrd:
  size: 155852800 bytes
  sha256:
.pcrsig:
  size: 2100 bytes
  sha256:
text:有如下结论:
- mkinitcpio 首先打包 initramfs 镜像,随后调用 ukify 生成 UKI,最后 sbctl 对生成的 EFI PE 文件做安全启动签名
- ukify 调用了 systemd-measure,计算 PCR 11 的预期值并对其签名,输出结果对应 PE sections 中的
.pcrsig /run/systemd/tpm2-pcr-signature.json结构与.pcrsig一致/{run,etc}/systemd/tpm2-pcr-public-key.pem内容与.pcrpkey相同
实际流程为:
- sd-stub 将
.pcr{sig,pkey}内容 注入 到/.extra下,进入 initrd 后再由 sd-tmpfiles 拷到/run/systemd(mkinitcpio !404, !414) - sd-measure 根据定义的 phase (enter-initrd/leave-initrd/sysinit) 推算 PCR 11 预期值,sd-pcrphase* 在指定时机 extend PCR 11,这也是为什么 注册 时 PCR 11 不直接作为
--tpm2-pcrs参数,因为会在系统启动的各阶段被更新 - sd-cryptenroll 生成 secret 写入 LUKS keyslot 和 TPM,使用 PCR 和 user PIN 保护
- sd-cryptsetup 询问用户 PIN,验证 PCR 11 的度量值,满足条件再基于前述 policy 从 TPM 中取出 secret
BitLocker setup #
根据上次设置 BitLocker 的印象在虚拟机里截了几张图,不一定对,仅供参考。
在 计算机配置 > 管理模板 > Windows 组件 > BitLocker Drive Encryption 下,启用
- Disable new DMA devices when this computer is locked
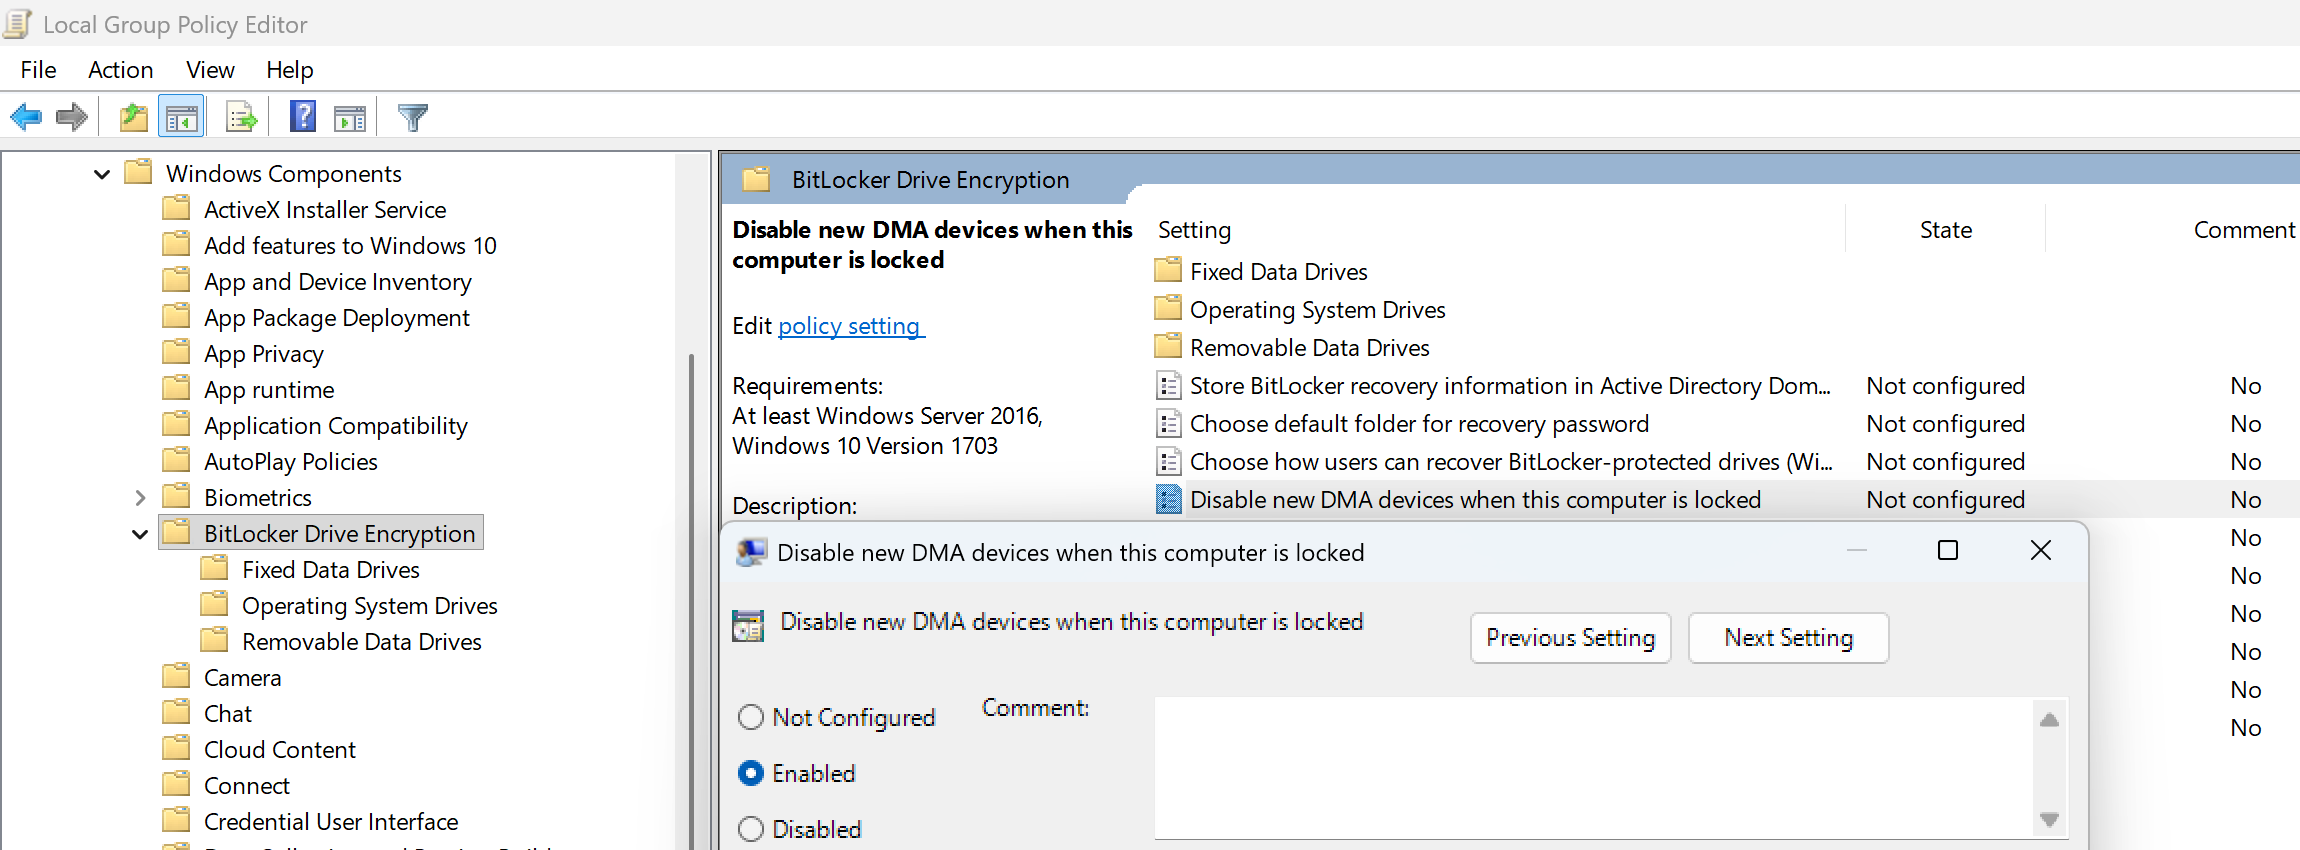
点开 OS Drives 目录,分别启用
- Require additional authentication at startup
- Enable use of BitLocker authentication requiring preboot keyboard input on slates
(因为 PBA 界面没法用屏幕键盘) - Allow enhanced PINs for startup
其中「Require additional authentication at startup」的设置如下所示,此处以 Pre-boot PIN 为例。仅保留一项解锁方式,否则 BitLocker 的图形向导会提示组策略冲突。
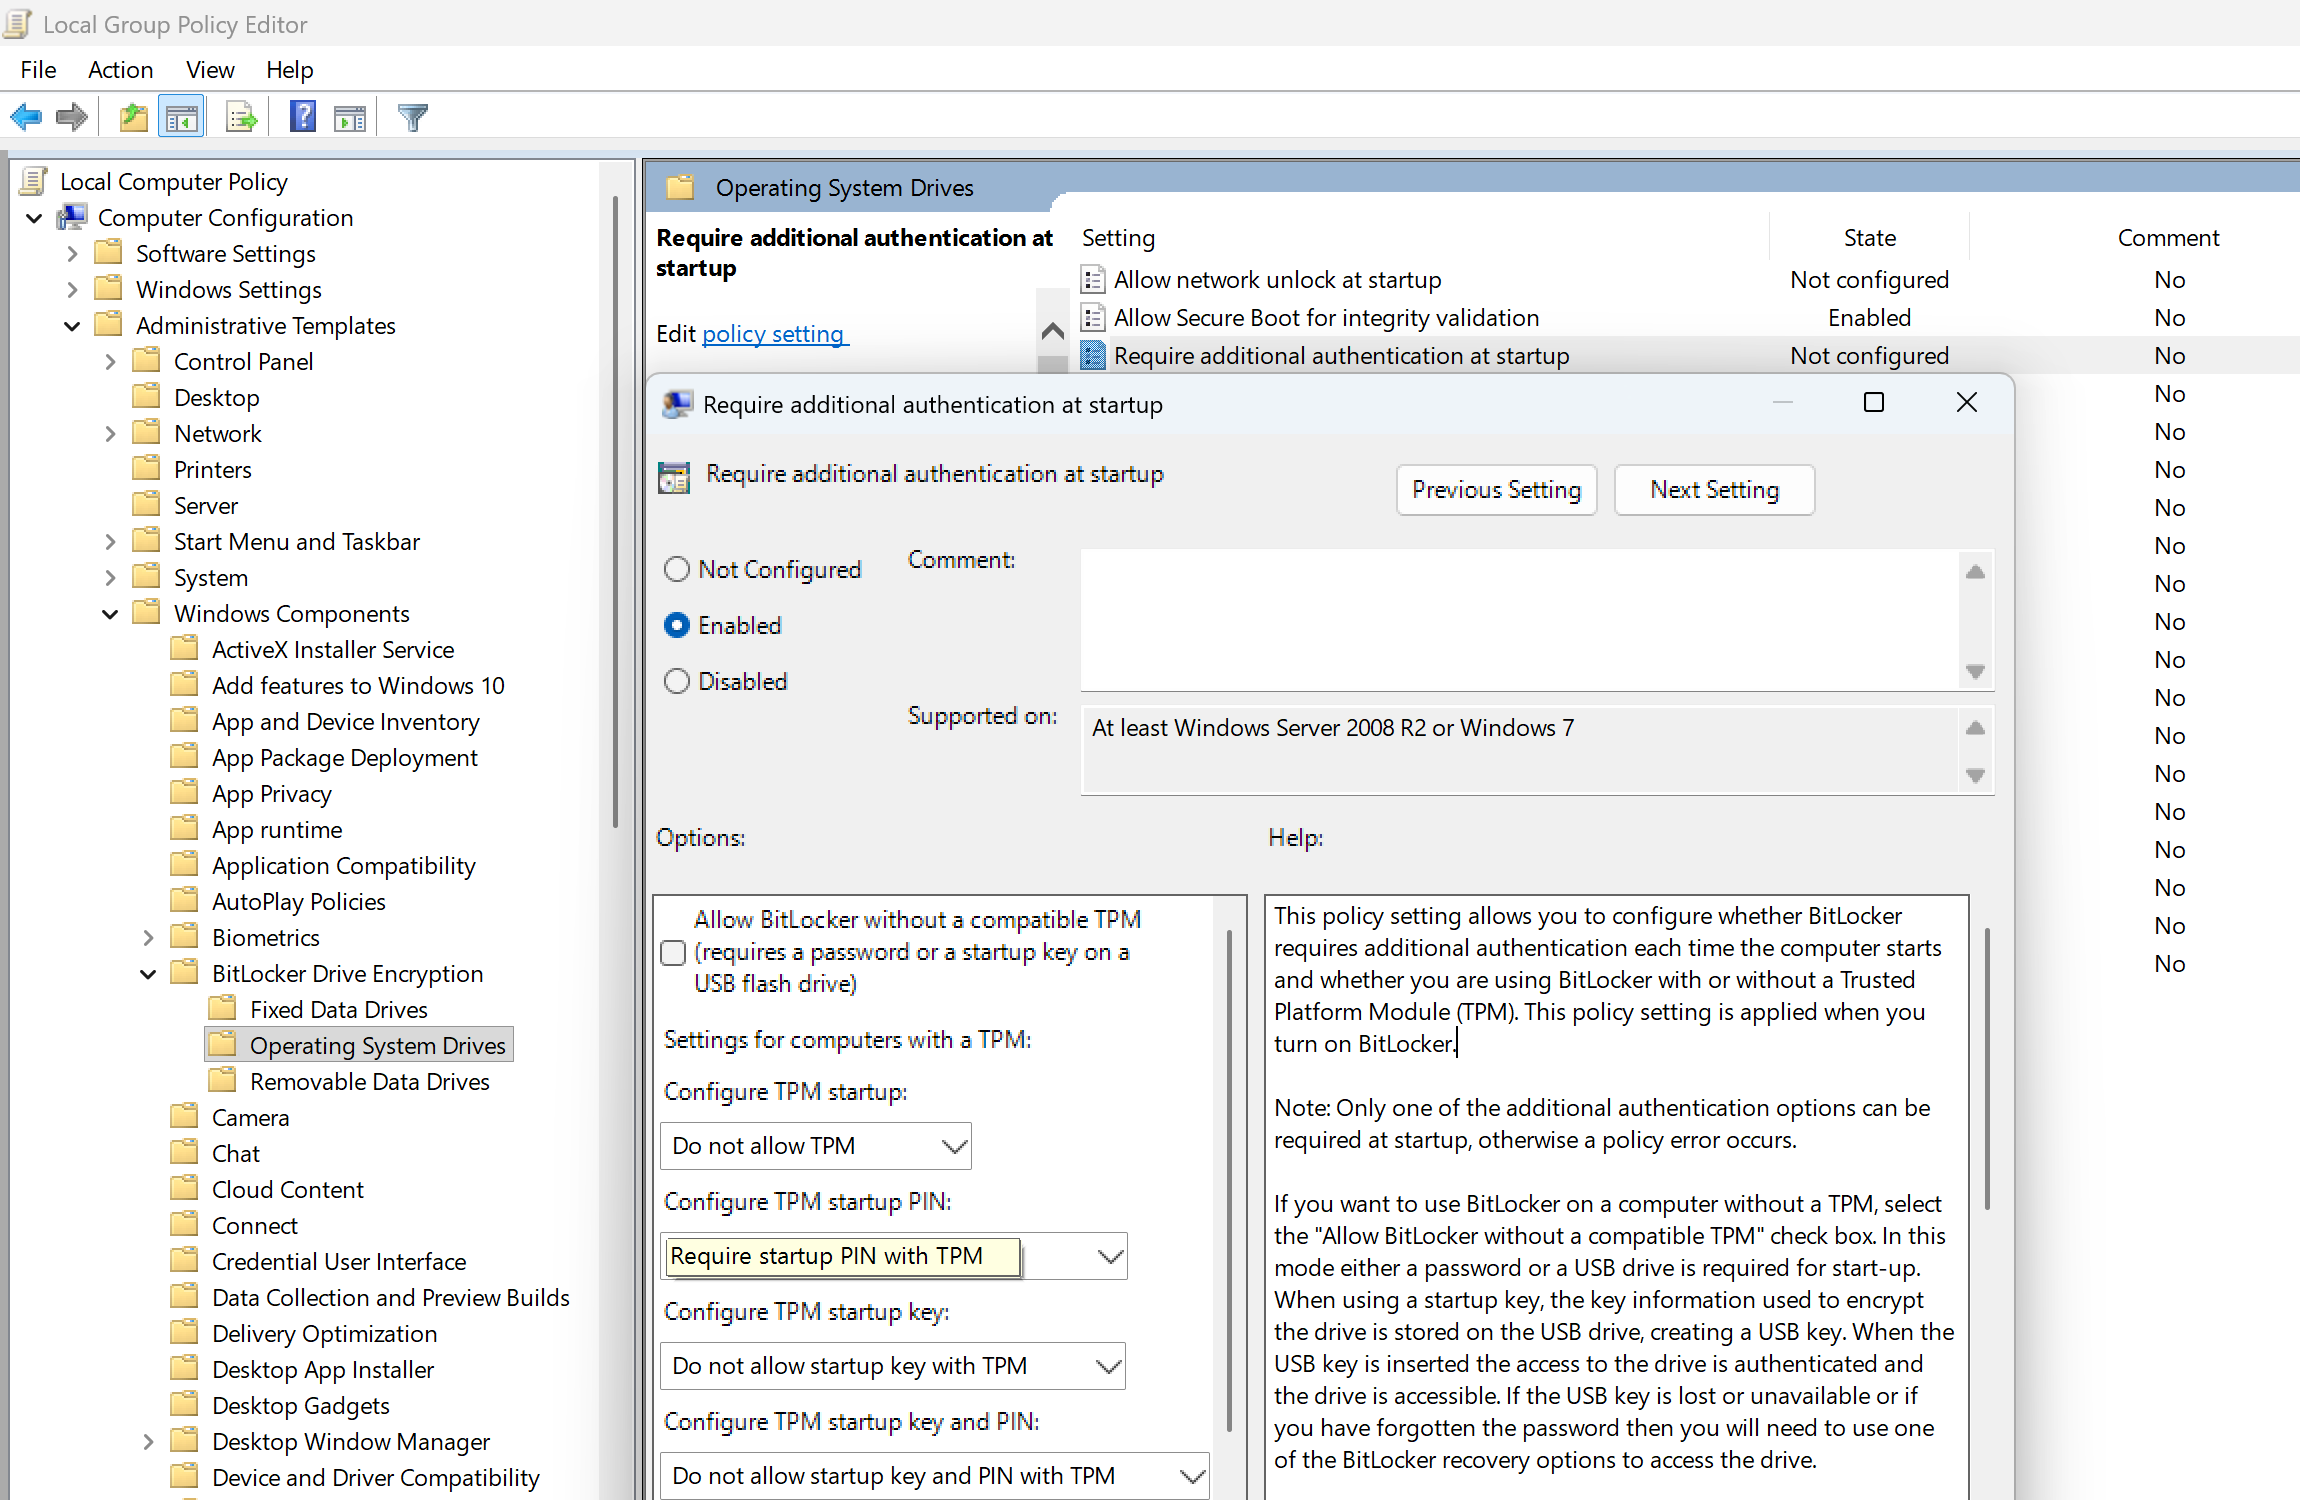
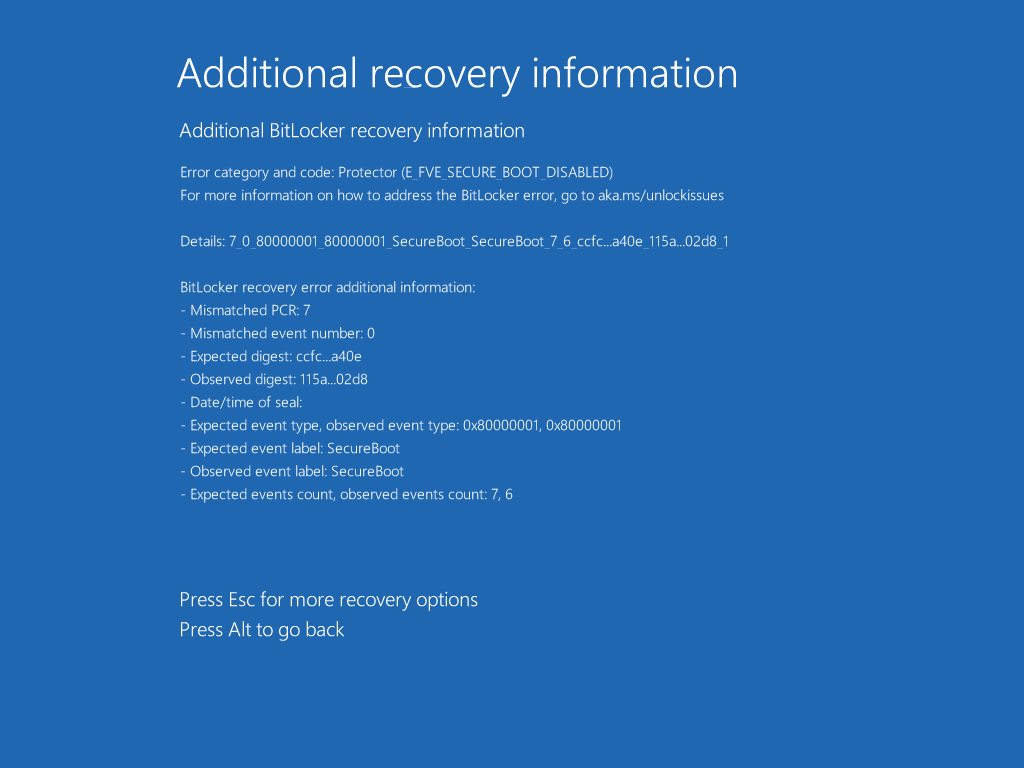
上述配置下默认使用 PCR 7+11 测量。禁用 Secure Boot,然后 PBA 随便输个错误密码:
禁用 TPM 后直接跳恢复界面:

最后一部分大概是现代 Android 的 Keystore 实现,虽然之前也算个半吊子 dev 但是退版本太久了,计划之后抽空翻一遍源码,搞清楚再写 ^^